
Tack & kit
How to Clip a Horse: Step-by-Step UK Guide
A practical UK guide to clipping a horse — clip types, equipment, safety, preparation, step-by-step technique, aftercare and rugging advice.
By Debbie Irwin · 17 April 2026 · 13 min read
Clipping your horse can make winter exercise more comfortable, reduce sweating, and help your horse dry faster after work. For many UK owners, clipping is part of winter management, especially for horses in regular work through wet, cold months.
Clipping is not suitable for every horse, and it does change how you manage warmth, turnout and rugging. A clipped horse loses some of the natural insulation provided by the winter coat, so rugging, shelter and daily checks become more important. At the same time, over-rugging can also cause sweating, discomfort and skin problems, so rug decisions should be based on the individual horse, weather, workload, clip type and living arrangements. Blue Cross and the BHS both advise owners to consider the individual horse rather than rugging simply because the weather feels cold to humans.
Why clip a horse?
Horses naturally grow a thicker coat in winter. This helps them keep warm, but it can cause problems for horses in regular work. A thick coat can trap sweat during exercise, making the horse uncomfortable and slow to dry.
Clipping can help by:
- Reducing sweating during exercise
- Helping the horse cool down more efficiently
- Making grooming easier
- Reducing the risk of the horse standing wet for long periods after work
- Keeping a working horse more comfortable through winter
- Allowing owners to manage a winter workload more practically
However, clipping is a management choice, not a necessity for every horse. Horses in light work, native breeds, older horses, horses living out, or horses who do not sweat heavily may need only a small clip or no clip at all.
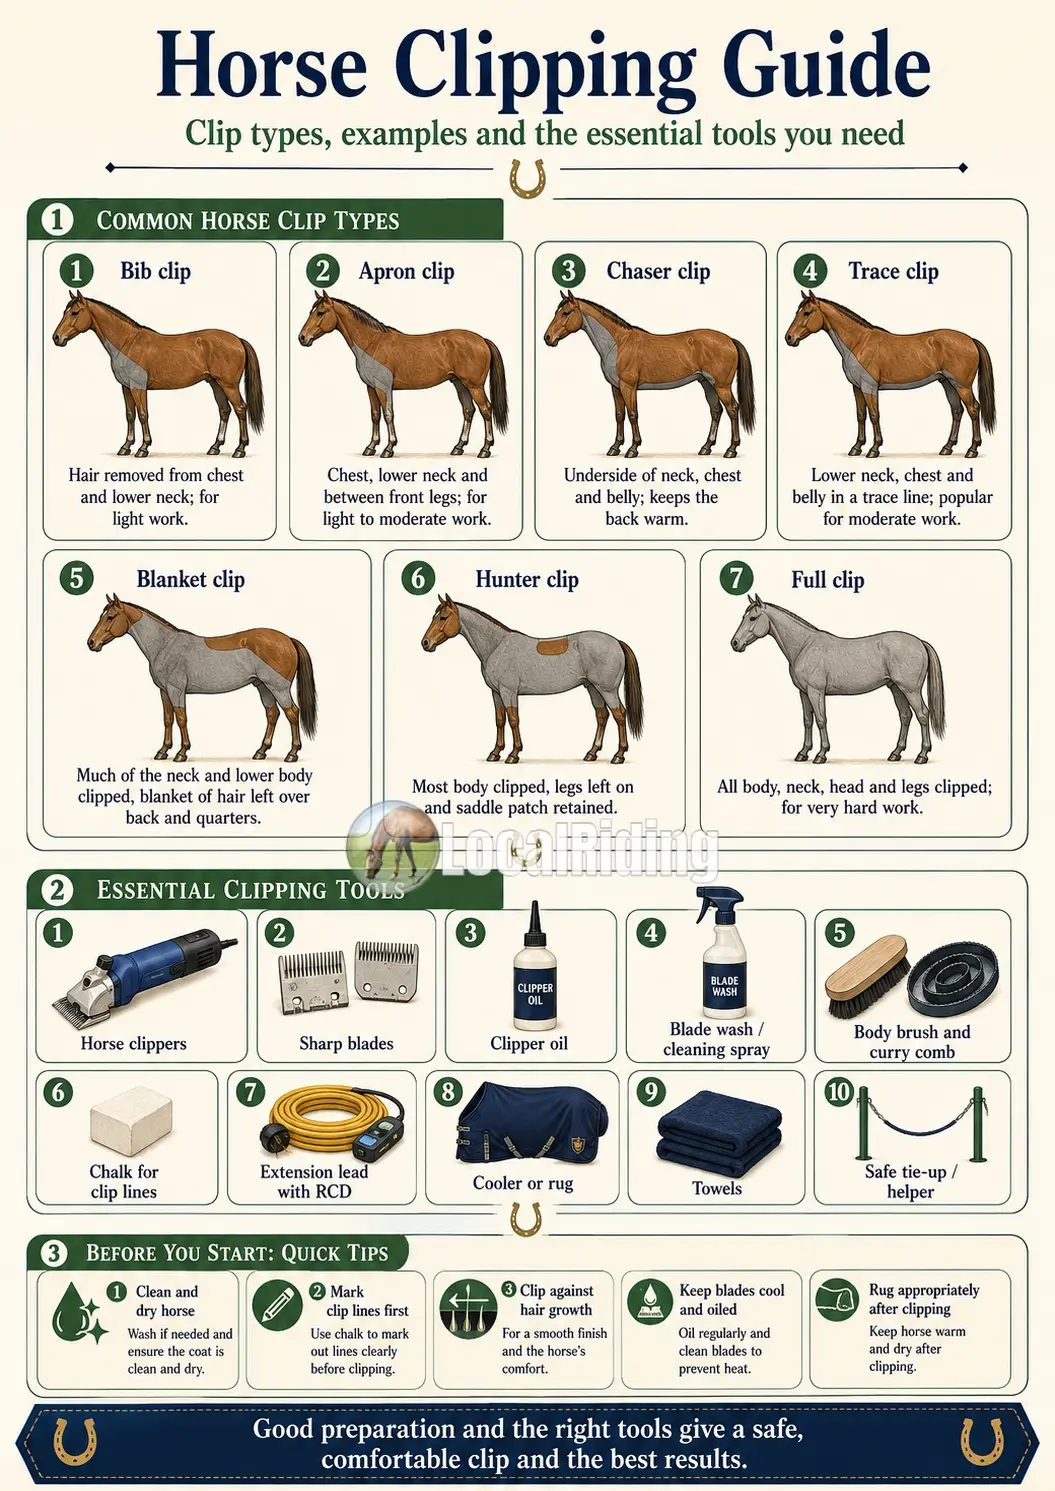 UK Horse Clipping Guide infographic — bib, apron, chaser, trace, blanket, hunter and full clip examples, essential clipping tools, and pre-clip quick tips
The main UK horse clip types, essential clipping tools and quick safety tips at a glance.
Should you clip your horse?
Before clipping, think about your horse's lifestyle and needs. The best clip is the one that removes enough hair to keep your horse comfortable in work while leaving enough coat for warmth and protection.
Consider these questions:
- How often is your horse ridden?
- How hard does your horse work?
- Does your horse sweat heavily?
- How long does your horse take to dry after exercise?
- Does your horse live in, live out, or do a mixture of both?
- Is your horse young, elderly, thin, native, hardy, sensitive or prone to weight loss?
- Do you have suitable rugs and shelter for the clip you are planning?
- Is your horse safe and settled around clippers?
If you are unsure, choose a smaller clip first. You can always take more hair off later, but you cannot put it back on.
When is the best time to clip in the UK?
Many UK horses are first clipped in autumn, once the winter coat has started to come through and the horse is sweating during work. Depending on coat growth and workload, some horses may need further clips through winter.
Many owners avoid clipping too late in the season, especially if the horse's summer coat is beginning to come through. Timing varies by horse, workload and management, so use your horse's coat, comfort and work level as the guide.
Types of horse clip
There are many variations, and clip lines can be adapted to suit the individual horse. The following are the most common winter clip types used in the UK.
1. Bib clip
A bib clip removes hair from the front of the neck and chest. This is one of the smallest clips and can suit horses in light work who only sweat around the chest.
Best for: light work, good doers, hardy horses, young horses starting out, or owners clipping for the first time.
2. Apron clip
An apron clip removes hair from the underside of the neck, chest and sometimes between the front legs. It gives a little more cooling than a bib clip while leaving most of the body coat intact.
Best for: light to moderate work with minimal rugging needs.
3. Chaser clip
A chaser clip removes hair from the underside of the neck, chest and belly, often running diagonally up the body. It leaves the back and quarters covered for warmth.
Best for: horses in light to moderate work who are turned out regularly.
4. Trace clip
A trace clip follows a line similar to old harness traces, removing hair from the lower neck, chest and belly. It can be low, medium or high depending on how much hair is removed.
Best for: horses in moderate work who sweat along the lower body but still need warmth over the back and quarters.
5. Blanket clip
A blanket clip removes hair from much of the neck and lower body while leaving a natural "rug" or blanket-shaped area over the back, loins and quarters.
Best for: horses in moderate to hard work who still need warmth over the back and hindquarters, especially if turned out.
6. Hunter clip
A hunter clip removes most of the body hair but leaves the legs on for protection and usually leaves a saddle patch to help protect the back from rubbing.
Best for: horses in hard work, hunting, competition or regular winter exercise.
7. Full clip
A full clip removes the coat from the body, neck, head and legs. This is the most extensive clip and leaves the horse with very little natural insulation.
Best for: horses in very hard work or competition, where careful rugging and stable management are available.
Important: full and hunter clips require careful rugging, monitoring and protection from wet, cold and windy conditions. They are not usually the best choice for a horse in light work or a horse living out without excellent shelter.
Essential clipping equipment
Good preparation makes clipping safer, quicker and more comfortable for the horse.
You will need:
- Suitable horse clippers or trimmers
- Sharp, clean blades
- Clipper oil
- Blade wash or cleaning spray
- A small brush for removing hair from the blades
- An extension lead with an RCD safety adaptor if using mains-powered clippers
- Chalk or grooming chalk to mark clip lines
- A body brush and curry comb
- Clean towels
- A rug or cooler to keep clipped areas warm as you work
- Overalls or old clothing for the person clipping
- A hat, gloves and safe footwear for the handler
- Treats or a haynet if appropriate and safe
- A safe, dry, well-lit clipping area
Blade maintenance matters. Blunt blades pull the coat, leave lines, make clippers work harder and can make the horse uncomfortable. Have blades sharpened regularly by a reputable service.
Safety before you start
Clipping involves electricity, sharp moving blades, vibration, noise and a large animal who may move suddenly. Safety should come before the finish of the clip.
Before clipping:
- Choose a dry, non-slip area with good lighting.
- Make sure the horse is calm, clean and dry.
- Use a safe tie-up point with quick-release twine or have an experienced handler hold the horse.
- Keep cables away from the horse's legs.
- Use an RCD when using mains-powered clippers.
- Check the clippers are working before bringing them close to the horse.
- Keep children, dogs and distractions away.
- Do not clip if the horse is wet.
- Do not clip over wounds, lumps, rain scald, mud fever, sore skin or swollen areas.
- Stop if the horse becomes unsafe.
If your horse is very anxious, dangerous to clip, or needs sedation, speak to your vet. Sedation should only be given under veterinary direction.
Preparing your horse for clipping
A clean coat is essential. Dirt, grease and dried sweat blunt blades quickly and make the clip uneven.
Preparation checklist:
- Bath or hot-cloth the horse beforehand if weather and facilities allow.
- Make sure the horse is completely dry before clipping.
- Groom thoroughly to remove mud, loose hair and grease.
- Pick out the feet and check the horse is comfortable standing.
- Plait or band the mane out of the way if needed.
- Mark your clip lines with chalk.
- Put a rug over areas you are not clipping immediately to prevent chilling.
- Let the horse hear and feel the clippers before starting.
Introducing nervous horses to clippers
Some horses are relaxed about clipping; others need careful training. Do not rush the process.
Desensitisation steps:
- Let the horse see and smell the clippers while they are switched off.
- Turn the clippers on at a distance and reward calm behaviour.
- Gradually move closer, staying within the horse's comfort zone.
- Touch the horse with the back of your hand, then with the clippers switched off.
- Let the horse feel vibration from the clippers without clipping immediately.
- Start with an easy area such as the shoulder if the horse remains calm.
- Keep sessions short and positive.
If the horse becomes frightened, go back a step. Forcing the issue can make future clipping much harder.
How to clip a horse: step-by-step
Step 1: Decide on the clip type
Choose the smallest clip that meets your horse's needs. Base the decision on workload, sweating, turnout, coat type and rugging options.
Step 2: Mark your lines
Use chalk to mark the clip lines before you start. Stand back and check both sides are even. Use natural landmarks such as the point of shoulder, elbow, stifle and saddle area to guide your lines.
Step 3: Oil and check the blades
Oil the blades before starting. Check blade tension according to your clipper manufacturer's instructions. Incorrect tension can cause poor clipping, overheating or blade damage.
Step 4: Start on an easy area
Many people start at the shoulder or lower neck. These areas are usually less ticklish than the belly, flanks or elbows. Place the flat of the blade against the coat before moving.
Step 5: Clip against the hair growth
Use long, smooth strokes against the direction of hair growth. Overlap each stroke slightly to avoid tramlines. Keep the clipper pressure even and avoid digging the blade into the coat.
Step 6: Keep the skin smooth
Use your free hand to gently stretch loose skin, especially around the elbows, chest, flank and girth area. This helps the blades glide smoothly and reduces the risk of catching skin.
Step 7: Check blade temperature often
Blades heat up during use. Stop regularly to brush away hair, clean the blades and apply oil. Test blade warmth against your hand. Hot blades are uncomfortable and can burn the skin.
Step 8: Work steadily, not quickly
Rushing creates lines and increases the chance of mistakes. Take breaks if the horse becomes restless or if you become tired.
Step 9: Rug as you go
As clipped areas are exposed, cover the horse with a rug or cooler if the weather or clipping area is cold. This is especially important for large clips.
Step 10: Finish and tidy the lines
When the main clip is complete, tidy uneven lines carefully. Step back often to check symmetry. Do not over-correct small imperfections; they usually become less noticeable after a few days.
Clipping difficult areas
Elbows
The elbow area has loose skin and changes shape as the horse moves. Ask the handler to gently bring the horse's leg forward if safe, or stretch the skin carefully with your hand.
Flanks and belly
Many horses are ticklish around the belly and flank. Keep your movements calm and predictable. Watch the horse's body language carefully.
Head and face
Only clip the head if it is necessary and the horse is safe and confident. Many owners leave the face unclipped or use quieter trimmers for sensitive areas. Take extra care around the eyes, whiskers, ears and bony areas.
Legs
Leg clipping requires patience and skill. Avoid clipping over scabs, mud fever, sore skin or swollen areas. Some horses need careful desensitisation before their legs can be clipped safely.
Girth area
Clip carefully around the girth area, as skin can be sensitive and uneven. If the horse reacts strongly, consider whether there is soreness, ulcers, poor saddle fit or girth discomfort.
Aftercare: what to do after clipping
After clipping, loose hair and clipper oil can irritate the skin. Give your horse time to settle and check them carefully.
After clipping:
- Brush off loose hair.
- Wipe the coat with a warm damp cloth if needed.
- Check for small nicks, sore patches or skin irritation.
- Apply a suitable rug based on the weather and clip type.
- Offer hay and water.
- Clean, oil and store your clippers and blades properly.
- Monitor the horse for itching, rubbing or sensitivity over the next few days.
Rugging a clipped horse
A clipped horse may need more rugging than an unclipped horse, but the right rug depends on the individual horse and conditions. Over-rugging can make horses hot, sweaty and uncomfortable, and Blue Cross warns that it can contribute to dampness, skin problems and rug rubs.
Factors to consider:
- How much coat has been removed
- Whether the horse is stabled or turned out
- Temperature, rain and wind chill
- Access to shelter
- The horse's age, weight and breed/type
- Whether the horse is a good doer or poor doer
- How warm the horse feels under the rug
Check your horse daily under the rug. Feel behind the withers and over the shoulder, not just the ears. A horse who is sweaty, damp, itchy or developing rubs may be too warm or wearing an unsuitable rug.
Common clipping mistakes
- Clipping a dirty coat: dirt and grease blunt blades and leave a poor finish.
- Using blunt blades: blunt blades pull the hair and irritate the horse.
- Letting blades get hot: overheated blades can burn or upset the horse.
- Choosing too big a clip: removing too much coat creates unnecessary rugging demands.
- Rushing the horse: frightened horses can become dangerous and harder to clip in future.
- Ignoring skin problems: do not clip over sore, infected or damaged skin.
- Uneven clip lines: chalk lines and regular stepping back help keep the clip tidy.
- Over-rugging afterwards: clipped horses need protection, but they still need to be monitored for overheating.
When not to clip
There are times when clipping should be delayed or avoided.
- The horse is wet or dirty.
- The horse has rain scald, mud fever, wounds or sore skin.
- The horse is very anxious or unsafe around clippers.
- The horse is unwell or recovering from illness.
- You do not have suitable rugs for the planned clip.
- The weather is severe and you cannot provide enough shelter or warmth.
- You are inexperienced and planning a large clip without help.
If in doubt, ask an experienced groom, clipping professional, instructor or vet for advice.
First-time clipping checklist
- Choose a small clip, such as a bib, apron or low trace.
- Make sure the horse is clean and dry.
- Use sharp blades and oil them regularly.
- Clip in a safe, dry, well-lit area.
- Have an experienced handler present.
- Keep the session calm and short.
- Stop before the horse becomes stressed.
- Rug appropriately afterwards.
- Check for rubs, irritation or signs of being too warm or too cold.
Frequently asked questions
Can I clip my horse myself?
Yes, many owners clip their horses at home, but you need the right equipment, a safe horse, good preparation and patience. For your first clip, it is sensible to have help from an experienced person.
Does clipping hurt a horse?
Clipping should not hurt if the horse is clean, the blades are sharp, the clippers are correctly maintained and the blades are not allowed to become hot. Pulling, heat, blunt blades or catching loose skin can make clipping uncomfortable.
How often should I oil the blades?
Oil the blades before you start and frequently during clipping. Many owners oil every few minutes or whenever they pause to brush hair from the blades. Always follow your clipper manufacturer's instructions.
Can I clip a wet horse?
No. A horse should be clean and dry before clipping. Wet or dirty coats are harder to clip, blunt blades quickly and can be unsafe around electric equipment.
Which clip is best for a horse in light work?
A bib, apron, chaser or low trace clip is often enough for a horse in light work. These clips remove hair from sweaty areas while leaving plenty of natural coat for warmth.
Do clipped horses always need rugs?
Most clipped horses need some rugging in cold, wet or windy conditions, but the amount depends on the clip, weather, shelter, body condition and individual horse. Check daily to avoid both chilling and overheating.
Should I clip my horse's legs?
Not always. Leaving leg hair can provide warmth and some protection, especially for horses turned out in wet conditions. If legs are clipped, keep a close eye on mud fever, skin irritation and cold weather management.
Final advice
Clipping can be a useful part of UK winter horse management, but it should always be done with the horse's comfort and welfare in mind. Choose the right clip for the workload, prepare carefully, keep blades sharp and cool, and adjust rugging sensibly afterwards.
The best clip is not the biggest or neatest one — it is the one that keeps your horse comfortable, healthy and able to do their work safely.
Sources and further reading
- Blue Cross guidance on rugging and avoiding over-rugging.
- British Horse Society rugging guidance for individual horse management.
- CAFRE clipping tips and common clip types.
Debbie Irwin
Livery Yard Manager & Equestrian Professional
Debbie has run professional showing yards and mixed livery yards in Lincolnshire and Essex for over 30 years. She has competed and taught at various levels. She writes about practical horse health, yard life, livery and everyday horse health and management.
Support Debbie on Ko-fi ☕Found this guide helpful? LocalRiding is run independently without ads. If you'd like to chip in towards the site's upkeep, you can buy Debbie a hot drink on a cold day on Ko-fi, she'll really appreciate it.